Tuesday, December 23, 2014

Recipe - Santa ice cream

Hi everyone! 

Long time no see.  Life has been absolutely insane these last few months, and I have been so busy just keeping afloat! I have been crafting - never fear - but I will save that post for after Christmas.  I do share a lot on the One Messy Mamma Facebook page too, so if you'd like to see more of what I get up to, check it out.
 
Today I'd like to share with you a Christmas tradition in our home - Santa ice cream.  We only make one batch, and only at Christmas, and Santa gets the first bowl on Christmas Eve.  Last year it was so hot that we left the ice cream in the freezer and put a note on the table with Santa's drink telling him to look in the freezer LOL!
 
So what is Santa ice cream? Why it's the bestest ice cream ever! Read on...
 
So basically you can use whatever you please in Santa ice cream.  Our favourites are maltesers, marshmallows and jelly lollies, but in other years we have used frozen raspberries and honeycomb. This year we used:
 
 
First chop up all the lollies.  I cut marshmallows and maltesers in half, jelly lollies into thirds (or more if bigger):

 
Then melt the ice cream slightly.  If you are using a brand new tub like I do, you'll need to take some out to make room for the filling.  The Boy and The Man are only too happy to help with that:


Next, mix the ice cream and lollies together in a big bowl.  If the ice cream is not soft enough, you'll get a bit of an arm workout.  If it's too soft, it will be like making a milkshake - in the middle is good.  You can see that my ice cream was melting faster than I could work!  Stupid hot tropical weather!


Next pour it all back into the tub.  You'll notice that even if you only took out 3-4 scoopfuls like I did that there isn't as much ice cream as you thought.  Normal! 
 
 
Then put it in the freezer.  I buried mine under some frozen meat to try and cool it quicker. 


And there it will stay until tomorrow night when we scoop some out for Santa to have with his Dr Pepper (yep, another tradition....not my thing, but Santa LOVES Dr Pepper, and funnily enough so does The Man ;)).

This is such a fun tradition in our home, and I hope that you enjoy making it as much as The Boy and I do, or eating it as much as we all do.  If you do make some, let me know what fillings you used!  Fruit and nuts? Mars bars? The possibilities are endless, and I'd love to hear what you come up with!

Merry Christmas to you from One Messy Household, and may your celebrations and the coming year be full of laughter.

Love,
OMM xox
Wednesday, October 1, 2014

Layout - daydream everyday

Hello!

I have been fairly quiet on the blog front for the past month or so.  I kind of just needed a break.  You know? I'm still happily crafting away, just not really blogging or even reading anyone else's blogs.  I have been active on Facebook, Twitter and Instagram since that is so quick and easy and I can do it from my phone.  You can follow me there if you would like to see my works in progress and various other things that take my fancy! :)

So on to today's share.  I was invited to participate in the Scrapping Outback October challenge as a guest designer - how exciting hey!?!  I spent AGES mulling over the glorious chipboard in their shop, and unloaded and reloaded my shopping cart several times.  I finally decided to use the words 'daydreamer' (less the 'er') and 'everyday'.  Originally I was going to scrap a photo of The Boy taken as he gazed out the window of a train, but I just couldn't get it to work with the colour scheme... So I went with another self portrait layout.


I had a ball creating this layout, which started out as a WHITE sheet of paper!


It was spritzed with 4 different blue mists (glimmer mist, smooch spritz and diluted Stampin' Up! ink) and some purple mist (diluted ink again).  I then used gesso and a stencil to add brickwork in key places and just kept spritzing and inking until I was happy with the dreamy look of the paper.


I then separated the ply of normal household tissue, spritzed with water, scrunched it and then laid it on the page to create texture.  I used gesso and a thick paint brush around the edges to make it stick down onto the page, and "splotched" it with a tissue.


 To make sure I had matching flowers, I dyed white Kaisercraft flowers (coconut bloom) in some left over diluted ink - I just used the cap off an aerosol bottle.  Only do this once though, I tried doing it twice for a better colour and all I ended up doing was having them fall apart! (Not a drama though, since I just reassembled the flowers and glued them back together).


And then it was just a matter of working out photo matts and flower clusters! 

TIP: keep your phone or camera handy.  When you have an arrangement that you like, take a photo of it before changing it or moving it.  Same goes for layout placement.

TIP: I glue my flower arrangements down onto scraps of card (or die-cut circles work well too) and that way I can move them around my page really easily until I'm happy.  It means I can poke in more bits and pieces as well (like those flourishes - they were a last minute addition! just be sure to trim any visible backing card away before you stick it down!

TIP: Don't be afraid to dye or spritz flowers to match your layout.  JUST DO IT!!! If you aren't happy with the colour, just keep working with it.  Or put it in your flower box for another project.  It's just paper!


TIP: Don't be afraid to try new techniques and see what happens.  I keep a stack of spare paper for The Boy to draw on, and I tried all of these techniques on that first to see what would happen, whether I needed more colour etc.  I also recommend putting a faint pencil mark on the layout where your photo will be placed.


The following products used in this layout are available from Scrapping Outback:
Chipboard: "daydreamer" and "everyday"
Flowers: Kaisercraft Coconut blooms (dyed with ink), glimmer mists
Cardstock: pansy, white

Thanks for visiting! Have a great day!

OMM xox

Sunday, September 7, 2014

Layout - self portrait

Hello lovelies! Have you had a great weekend? I hope you have! I have been treading water so to speak - very busy but not much achieved... Not as much as I'd like to have done anyway!

I did, however, get a layout done today!!! I love blue and yellow together, and when I saw this month's challenge at Scrapping Outback, I couldn't wait to get inking!! This month it's another colour challenge, white with a colour twist! Here's the photo inspiration:

Doesn't it look so nice and refreshing??? I want one, stat!

And here's my layout:


I love it! And here are the details:

Layout recipe:
Cardstock/paper: white, blue check (Kaisercraft, Oh Boy! Collection), off cuts of blue, white and yellow
Spritzing: sapphire glimmer mist (Tattered Angels - the darkest flowers are white spritzed in this colour as well), sea kiss smooch spritz, Broken China distress ink (diluted in a spritz bottle)
Embellishments: flowers, pearls (on stems and sticky), chipboard stars (covered in silver fox smooch), leaves, metal frame + brads, rub on sentiment (Kaszazz), sewing thread
Dies: delicate doilies (Stampin' Up!)
Tools: sewing machine, Big Shot, distress tool

Challenge:
Scrapping Outback: September: White with a colour twist (photo)

I've got a few fun projects lined up for the next week and beyond, some of which may or may not breathe fire.... Just sayin ;) stay tuned!!!!

Love, OMM xox

Wednesday, August 27, 2014

A little crocheting, and a gift card (featuring Autumn Moon Designs)

Wednesday!!! YES! It's mid week and winding down into another glorious weekend.  I have SO MUCH to do and not enough hours in the day.  Do you feel like that?

Today I have a quick share that my Facebook followers have already seen earlier in the week.  I've had this Raff digi from Autumn Moon Designs printed ready to colour for a few weeks now, and when I flicked through a crochet magazine at the newsagent the other day and saw this cute Giraffe beanie I just KNEW what I had to do!!!


The pattern did call for 8 ply, but I think next time I would adjust the pattern to use 4 ply and a smaller hook and just do more rows.  But I think he is super cute anyway and very snuggly!!! And well.  What can I say about the digi, I just love it.  I had intended to originally use the image on a layout featuring the giraffes at Taronga Zoo, and I might still do that, but I love it on a small gift card as well!!!

Giraffe beanie hat recipe:
- 8 ply wool in yellow, caramel and dark brown
- googly eyes
- wool needle
- pattern from Quick and Easy Crochet - summer 2014

Gift card recipe:
Cardstock/paper:  offcuts of blending card, yellow bazzill and Soft Suede (SU!)
Stamps: Raff digi (Autumn Moon Designs) and Bitty Banners (SU!)
Colouring medium: copics
Ink: Sweet baby stamped with Chocolate Chip ink (SU!)
Die: Bitty Banners (SU!)

Challenges:
Fan-Tastic Tuesday: #50 ATG
Sister Act Card Challenges: #71 ATG
4 Krafty Girlz Challenges: #25 ATG
Crafters Cafe: #77 Square cards only
Tuesday Throwdown: #210 ATG
The Cheerful Stamp Pad: #93 A new baby

Thanks for visiting :) And thank you to everyone who leaves some love in the comments - I don't always get a chance to reply but I do love to read each one as they come through :) 

xox OMM

Friday, August 22, 2014

Card - happy birthday! (Featuring Autumn Moon Designs)

What. A. Week.

Tonight (Friday) is the first evening I've been able to come straight home from work and relax. I'm very grateful to be spending the day at home tomorrow, and volunteering at the heritage centre on Sunday - the best kind of weekend :)

Today's card is CAS style, featuring Hansel and Gretel from Autumn Moon Designs.


Aren't they so cute? I know Samantha is working on more fun images that will be available through the Facebook page very very soon so if you aren't a FB fan yet, do yourself a favour and get over there!!!!

Card recipe:
Cardstock/paper: Whisper White (SU!) & off cuts
Stamps: Hansel and Gretel (Autumn Moon Designs), Itty Bitty Banners (SU!)
Colouring medium: copics
Die: Bitty Banners (SU!)
Other: white brads

Challenges:
Sister Act Card Challenges: #71 ATG
Crafty Girls Challenges: #25 ATG
Fan-Tastic Tuesday: #49 ATG

Thanks for visiting my little corner of Blogland!
xox OMM

Wednesday, August 13, 2014

Card - for you (featuring Noor Design)

Hello again!

When I received a free digi in my Noor Design newsletter a few weeks ago, I couldn't wait to colour her up! I painstakingly flicked and blended and shaded her skin, hair and clothing.... And then she disappeared. I found her today in with some cardstock and quickly finished her off and turned her into a card:


Isn't she so adorable? 


Card recipe:
Cardstock/paper: Whisper White and Chocolate Chip (both SU!), off cuts (various)
Stamps: Noor Design, sentiment from Bitty Banners with coordinating die (SU!) 
Colouring medium: copics
Ink: Chocolate Chip (SU!)
Other: flowers (Kaisercraft), sticky pearls, pearl stems

Challenges:
Tuesday Morning Sketches: #262

Brown Sugar Challenge: #106 use a banner
Sister Act Card Challenge: #69 anything goes
4 Krafty Girlz Challenges: #24 anything goes
Fan-Tastic Tuesday: #48 anything goes

Thanks for visiting! 

xox OMM

Card - Fairy Tenderhearted by Tiddly Inks

Hello crafters and craftees!

Do you believe in fairies? What a wonderful part of childhood, and even now I enjoy a good story about wee folk. I grew up devouring Enid Blyton stories, and admiring the beautiful illustrations of Shirley Barber. A copy of Lady Cottington's Pressed Fairy Book even entered our house at one stage, smuggled in by my mischievous Grandma. This was greeted with the delighted horror that only kids can indulge in. My mother was horrified and made sure the book was promptly sent home with Grandma, never to appear in our house again. I do believe it sits on Grandma's bookshelf still, between the ballet and art books.

I still love my fairies and have had to physically restrain myself from buying up every fairy stamp, paper and sticker I see!! However,when it comes to Tiddly Inks images, I simply could not deny myself Fairy Sunny Day (see a previous card here) and Fairy Tenderhearted (cards shared below and here) when I recently ordered some rubber and acrylic stamps from the US. There are several more on my wishlist, and I'm so excited they are available in digi direct from the designer! Check out the store here to see everything that Christy has made available (and be prepared to fall in love!!!). And if your hubby asks, it wasn't ME that sent you *wink*. (Enabler Alert!!!)


This image has been stamped on vellum using Stazon Jet Black ink, and then coloured from the back using chalks from Pebbles Inc. the ones I used today makes the image all shimmery and gorgeous!! It gives this image a very soft fairy like quality. A more vibrant result can be achieved by using inks or watercolours with the same technique. If using chalks, I do recommend "smooshing" your image when you are done, especially if you are colouring on the front of your image or straight onto cardstock.  To smoosh your colouring, simply place the image chalk side down on some scrap paper and rub firmly using the side of your fist. This will help push the chalk into the fibres of the card, and shouldn't rub off onto your fingers or the inside of the envelope.

So in summary:

Card recipe:
Cardstock/paper: whisper white, purple offcut, mulberry paper, vellum
Image: Fairy Tenderhearted (Tiddly Inks)
Ink: Stazon Jet Black
Colouring medium: chalks (Pebbles Inc)
Other: ribbon, button

PS!!! Tiddly Inks is having a DT call - ending midnight CST 12 August (I know, I know, I'm cutting it fine!) and if you do ANYTHING today you MUST go and check out all the fabulous talent in the applicant pool!!! The applications are AMAZING!!!! Go! now! (You're welcome!)

Oh! I nearly forgot. Here's another quick card I whipped up today, this time using distress Inks!


Thanks for visiting!!!

oxo OMM 


Monday, August 11, 2014

Layout - mummy & me

Happy Monday! I hope your week has started well. I am homebound for the next few days on doctor's orders so hoping to get some projects done... Of course I could be cleaning my craft room but where's the fun in that???

Here's a project I've been saving to show you - I had hoped to take a photo in my favourite photo staging area at work, but well that has been dashed for the time being! It's a fun layout using the current Scrapping Outback challenge - white with a photo colour twist. Here's the photo:

And here is my layout: 


I love these soft colours and the chance to do a pretty layout. This selfie photo was taken last year after The Boy and I had been to his first local show, even though I was fighting a cold we had a great time checking out the animals, exhibits, stalls and of course rides. Well he went on kids rides. One was enough for me and I'm very grateful not to have been sick when we got off... Yes the tea cups ride makes me sick - I admit it!!

Layout recipe:
Cardstock/paper: white, green, pink, yellow, peach
Other: mister (gold shimmer (Tattered Angels), Certainly Celery ink refill (SU!) and pink perfect pearls (Ranger)), distressing tool, flower stencil, texture paste, chipboard title (A2Z Scraplets), white ink (SU!), lace, charm, flowers, leaves, flourish die, leaves die (Spellbinders Shapeabilities)

Challenge:
Scrapping Outback - white with a photo twist

Thanks for visiting 

oxo OMM

Tuesday, August 5, 2014

Card - thank you

Hello again!
One more card to show today, this one is using one of my current favourites by Tiddly Inks. I love her, and she's so fun to colour to boot!


Card recipe:
Cardstock/paper: off cuts, including Elegant Eggplant (SU!)
Stamp: Tiddly Inks
Colouring medium: copics, smooch, twinkling H2Os
Embossing folder: honeycomb (SU!)
Other: green ribbon, charm, black pen

Challenges:
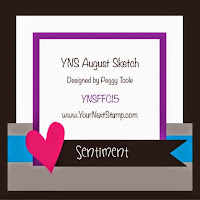
Sketch: Your Next Stamp #15 week 1 & August photo challenge


Thanks for visiting!! 

Card - happy big day

Happy Tuesday!

I hope this week is being kind to you. I have been sick for nearly a week, and unable to sleep so I am currently cozied up under a blanket watching an episode of Castle while some lunch cooks and then another nap I think. I'm looking forward to having my usual enthusiasm and bounce back!

Luckily I have two cards that I finished over the weekend that I hadn't had a chance to share yet. The first one is this girly card using this gorgeous digi image from Autumn Moon Designs. Isn't she beautiful?


And showing my fabulous new watermark from Autumn Moon Designs too!!!!! I LOVE it!!! 

Card recipe:
Cardstock/paper: off cuts, but pinks believed to be Strawberry Slush and Pretty in Pink (SU!)
Stamps: Cinderella (Autumn Moon Designs), Chalk Talk (SU!)
Colouring medium: copics, shimmer pen for highlighting, Strawberry Slush ink
Dies: circle collection, Chalk Talk, Little Leaves (all SU!)
Other: flowers, pearl stems, sticky pearl

Challenges:
Sister Act: #68 anything goes
Milk Coffee: 2 or more diecuts
4 Crafty Chicks: anything goes
CCC Digi Creations: #6 digi, pearls, lace
Crafters Cafe: #74 use a digi
Crafty Girls Challenges: #23 anything goes

Thanks for visiting!

Tuesday, July 29, 2014

Card - come to my slumber party?


Hello!
I hope your Tuesday has been great! I've been home today with a sick little man, so we have been watching movies and cozying up on the couch in a "nest".  My mum always made us a nest to sit in when we were sick, and I now do the same thing for The Boy.  What special thing do you do when your kids are sick?
 
Today I'm showcasing a set of cards I have been working on for the last fortnight, but only just finished... Ok so 'procrastinating' might be a better term LOL!!! The set are for a friend's daughter (Miss 8) to give out as slumber party invitations for her birthday in a few weeks.


Feedback is that Miss 8 loves them!!!! Yay!
 
Card recipe:
Cardstock/paper: Blossom Pack (DCWV), AC Cardstock
Stamp: Slumber Party Dena (Mo Manning)
Colouring medium: Copics, highlighted with smooch
Other:  Lace, ribbon (Kaszazz), flowers, leaves, pearl stems, doily (SU!)
 
Challenges:
Fat-tastic Tuesday: #46 anything goes
Sister Act Card Challenge: #67 anything goes
Milk Coffee: birthdays
Simply Create Too: for a child
Paper Pretties: PWC320 pink & green
 
Happy crafting!
OMM

Friday, July 25, 2014

Mini cards - with love

Good morning crafters and craftees!

We have woken up to overcast skies and a cool breeze this morning in tropical north Queensland... good for the garden and good for the soul!  

Today I have a quick card to show you that I think I am slightly addicted to now... I whipped up two last night and stamped out images to do another half dozen... oh dear... LOL.


These cards are 11x8cm and perfect for a gift tag or thank you note - which is what the blue one is for especially - she's going out with a parcel today!

Card recipe:
Cardstock/paper: from my offcut box
Stamps: Fairy Tenderhearted (Tiddly Inks)
Inks: Staz-on Black, Basic Black marker (SU!)
Colouring medium: prismacolors and gamsol

Challenges:
Tiddly Inks: #137 tiny creations or ATC

Cute Card Thursday: #331 for the birds

Thanks for visiting!!!

PS One Messy Mamma is on Facebook! There will be a giveaway when I reach 100 Facebook fans!!


Monday, July 21, 2014

Card - mermaid birthday


Hello again!

I was honoured to recently be invited to join the Design Team over at Autumn Moon Designs and work with the very talented Samantha and my very crafty teamies.  I am busy working behind the scenes on a few cards and other projects showcasing some of my first images, and today I have a card showcasing "Ariel" for you:


Samantha has some really lovely designs in the works, so go over and like her page on Facebook to see them as they are released!  There's also a contest on the page, with a digi provided for those wishing to enter (by emailing the designer).
 

Card recipe:
Cardstock/paper: SU!, DCWV
Stamps: Ariel (Autumn Moon Designs), Petite Pairs (SU!)
Colouring medium: Copics, Smooch, Twinkling H2Os
Other: mixed flowers and foliage, silver charm, ribbon, sticky pearls

Challenges:
Creative Card Crew: #66 Seaside/beach (what could be more fitting than a mermaid???)
Pile It On: #29 Summer Fun
Fan-tastic Tuesday: #44 Anything goes (but hip to be square) (and check out her freebies on Sundays!)
Cute Card Thursday: #330 Fun in the sun
Stampin' Royals: July anything goes
Scribbles Designs: #19 Sea, sand and surf
Brown Sugar: #103 Sea and sand

Thanks for visiting!

And don't forget: as well as following my blog, you can like my Facebook page for regular crafty and messy updates and more!


Card - aaarfff!

Hi there!

 Over the weekend I was thrilled to finally get together with some crafty gals to do some colouring!  Although of course, I was too busy chit-chatting and well... most of my colouring from the morning was a complete and utter DISASTER.  Simply because I was so distracted!!! LOL!!! Oh well!!!

I got home last night and thought I'd quickly put this card together as I really need to get my stockpile up again!  This image is one of the Mo Manning characters "Baron and Butch" which you can buy here as a digi.  I bought it with some other images for a very special project, which I hope to bring to you in a few months.

I love this image because it reminds me of The Boy and Boy Dog.  The Boy LOVES his tablet (anything electronic really, he's a bit of a whizz), but has a very special friendship with Boy Dog.  He adores Girl Dog too, but Boy Dog has a special special place in The Boy's heart... lap.... bed..... LOL


Card recipe:
Cardstock/paper: Stampin' Up!, Kaszazz, Echo Park, offcuts, blending card
Stamps: Animal Talk (SU!), Baron and Butch (Mo Manning)
Ink: Memento Black, Cherry Cobbler (SU!)
Other: distress tool, silver clip, brown ribbon with blue stitch (Kaszazz), coloured pearls (Kaisercraft)

Challenges:
Mo's DP2 challenge blog: #233 Birthday card for a boy
Sister Act card challenge: #66 anything goes

 Thanks for visiting!


Giveaway over at PPP!!!

Happy Monday crafters!

I have a card or two to share with you all, but that will have to wait - because STOP PRESS there is a FABULOUS giveaway over at Pink Paper Paradise right now!!! Look, look LOOOOOOKKKKK at what deliciousness you can win!!!!


Visit this post to enter!!  Competition closes 31 July 2014, and is open worldwide!!!

Monday, July 14, 2014

Layout - CAMping

Hello again!

Last layout for today - see my last post for why this wasn't posted over the weekend like I'd hoped!!!

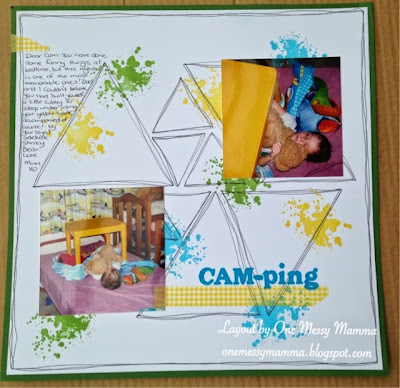
This layout was also completed at our retreat last weekend.  Triangles were definitely very tricky to work with!  I ended up repeating the style from the "hello baby" layout which didn't quite work as well with triangles as it did with squares but was still a lot of fun to sketch out!

"CAMping" is based on the July 1 Stuck?! sketch:


And kept really simple.  The journalling talks about how The Boy (AKA Cam) went through a stage of sleeping with random objects in his bed, including his little yellow table that looked like a little tent!!


Layout recipe:
Cardstock/paper: Bazzill, white
Stamp set: Gorgeous Grunge (SU!)
Inks: Tempting Turquoise, Daffodil Delight, Gumball Green (all SU!)
Other: black pen, pencil, ruler, washi tape (SU!)

Challenge:
Stuck!? Sketches: 1 July sketch

Thanks for visiting, and hope you are getting some time to scrap this week!